Showing posts with label Holidays. Show all posts

Happy Mother's Day

This special post was submitted by our interior design partner Yolanda Ellis in anticipation of Mother's Day.

Decoupage is a crafting technique of decorating an object by gluing paper onto an object. This is seen on boxes, frames or other objects that you can think of that can be covered or decorated with paper. The idea to decoupage a vase with memorable mother and child pictures was inspired by my many occasions when my lovely husband blessed me with beautiful flower arrangements for Valentine's Day, birthdays or a just because I love you day.

I am a working mom and love fresh flowers on my desk but I also love having pictures of my loved ones around me. Every time I would get new flowers, I was faced with the dilemma of too many things on my desk. I have to remove some pictures to get my flowers on my desk or put my flowers somewhere else. Well I have learned over the years that one problem for one person adds up to be a problem for many others. Then the light bulb comes on..why not decoupage all the pictures you love on a vase.

Then you can conserve space and you can have your flowers and pictures too. As a mom what great joy it is to come to work and see pictures of your loved ones and topped with a beautiful floral arrangement especially with your favorite flower(s). My favorite is the Anthurium plant. I love tropical plants. By using a plant potted in your special vase this does not last for just one week of joy but all year long. This is a handmade gift that is personalized with love.

Design suggestions:

- Any planter can be used to do this technique

- For Mother's Day - use pictures of vacation, special moments that you both shared, notes of inspirational words, poems.etc. Decoupage this on the planter you selected.

- Herbs can be planted in the vase as an alternative to flowers or plants for the Mom who likes to cook and they place it in the kitchen or window seal.

- This is also a great gift for Moms in nursing homes or assistant living centers for a gift that keeps on giving.

- You can also embellish the containers with a unique ribbon or word magnets from Artistic Lifestyling


How to do this project:

Items needed:

- A vase or planter or container
- Decoupage glue - found at your local hobby store Picture here
- Dry cloth
- Scissors
- Pictures/poems/inspirational words
- Sponge brush
- Ribbon
- Embellishments, optional but highly encourage to apply with a hot glue gun
- Hot glue gun (use to adhere embellishments)
- Potting soil (if using to plant herbs or a plant)
- Plant or herb or fresh flowers

Directions:

1. Choose your container and make sure it's clean and dry

2. Gather your pictures - and photocopy (either all black and white or all in color)

3. Make a collage with the pictures on the table before you start gluing.

4. It's helpful to brainstorm before you start.

5. Use photo copies instead of original pictures.

6. Make sure the ink is dry if you have printed them from an inkjet printer at least 24 hours

7. Then tear the pictures to give irregular edges or cut them to give them a clean edge.

8. Once you decide where you want to place the pictures on the vase then start gluing the pictures onto the vase or container. Cover each picture thoroughly with glue or artist gel medium. After the entire vase has been covered with your pictures then apply 2 layers of decoupage glue. Allow the vase to dry for 1 to 2 hours.

9. Finally plant your Mom's favorite flower, herb or place a fresh bouquet of flowers inside.

Halloween Photos


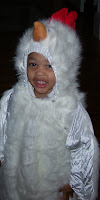
Here are two photos from our Halloween eve. Ethan the scary chicken and...


Matthew as Darth Vader... :-)

More Creative Tables

Thanksgiving is almost here. That means you have a few weeks to get your menu and your home decor together. If you need something to eat on, and are feeling crafty - here's a few ideas to get you going. Just be sure to tackle this table project outside - it can get messy.


First gather your materials

You'll need enough decorative elements to execute your tabletop design. Here are a few materials you might want to use:

  • Tiles - Large or small, you can make a faster mosaic design using the epoxy as a cover.
  • Metal - Not an entire sheet of metal that completely covers the table, but try recycled ceiling tiles, or smaller pieces of scrap metal.
  • Paper - You can patterned or plain. I especially like the look of worn/crinkled brown wrapping paper.
  • Small pipes
  • Wood
  • Paints
  • String
  • Ribbon
  • Buttons
  • Place mats
  • Textured Fabric (burlap works nicely)
  • Nailhead trim
  • Edging for table (see comments below)

These are the two required materials:

  • Epoxy Resin (You can find resin at your local hardware store in larger containers or online.)
  • Table Surface (You can cover an existing table or re-purpose another object like a intricately carved/decorative door. You can also make a table out of almost any surface including heavy plywood.)

Next, you'll need to prep the table/surface

If you plan to use a flat surface, but wish to "suspend" your bulkier design elements within a thick layer of epoxy, then your table must have an edge to hold the liquid epoxy. Attach veneer duct tape, or wood molding to build a raised edge around the table. Make sure that you fill any gaps on the raised edge so that the epoxy doesn't seep through.

If you just want to brush on a thin coat of epoxy you won't need the molding edge. And if you're using a door you may just need to fill in the carving by pouring the resin into the nooks and crannies.

Once the table is prepped, create your design...

Have fun with the materials you've collected. Remember that if the design materials are bulky, you'll need a thicker coat of resin to cover the materials and remain even with the edge. You may want to stick some of the materials to the surface to ensure that they don't move when you pour in the epoxy.

If you're using a thin coat, don't forget to decorate the sides of the table. Consider using the nailhead trim if you're wrapping the existing table with fabric or the crinkled paper.

Once you're done with decorating, mix and pour the epoxy resin according to the directions. Thicker layers require multiple coats. You can also suspend small bits of glitter or small objects between coats too. For a thin layer use an old brush to apply the epoxy coat over and around the sides of the table.

Now, just let it dry according to the time specified on the directions.

Enjoy!

Lise

---------------

links:

Waldmachers Furniture Restoration

Bottle Cap Bar

Happy Halloween!

I took a few minutes to watch Martha's show last night. She was making last minute Halloween costumes. Really they were just the head gear made from lightweight Crayola clay fashioned into caterpillars, unicorn horns and antenna. The clay dries without baking and it can be painted. Martha kind of "owns" Halloween. I don't recall another mainstream lifestyle expert who is so fascinated with this particular holiday. Anyway, she and her staff created some very interesting projects - but the stars of the show were definitely the kids!

They were so adorable in their costumes; and they definitely held their own while Martha asked question after question.

This year I'm taking Matthew and Ethan out to trick or treat. Matthew is Darth Vader and Ethan is a chicken. I will post some pictures of the costumes soon.

Happy Halloween!

A view from my front steps...


Every year I think I'm going to style my front porch - this year was no different. With little time after writing to do much more than sleep, I've managed to plop a few pumpkins on the top of my steps. I had three, one went bad already!

So anyhow this is a view of what's there now - maybe this weekend I will expand on my styling and let you take a peek at that effort. Or maybe I'll get a little extra sleep :-)

If I could give you the stars...


This post is for my male readers. Valentine's Day is February 14th. I'm telling you about this early so that it doesn't sneak up on you. This year you don't have to spend a small fortune on flowers and candy, or baubles and beads - unless you insist. No, this year I'm challenging you. (Men like challenges right?)


OK - so here's the deal. This year tap into your feelings of love and passion and do something completely out of the box - create something from the heart. (hmmm, that's so fitting on Valentines day isn't it?)


Here are my suggestions. Don't worry they won't hurt.

  1. Get out of your comfort zone. There is nothing more charming than watching a man who is a little unsure but still committed to doing something special for the one he loves. A good example is the man who rarely cooks; but decides to visit a gourmet shop, purchase yummy food, read a few cookbooks and blogs for expert advice and then take the day off to prepare a meal that surprises his love with a meal to swoon over.

  2. Get out of your own backyard. Similar to #1, but this involves travel to a place off the beaten path. You don't have to travel outside your timezone if you don't want to - but you should plan to hold hands and go someplace that you know your love will enjoy. Try a bed and breakfast; a park in a neighborhood you don't frequent; a new bistro; a weekend workshop; or a morning trip to a cute boutique to buy the pj's you'll stay in for the rest of the day.

  3. Finally - (you guessed it) Be Creative... Make a card, photo montage, a pair of mittens, a key to your heart, a love story, a poem, a sock monkey, or felt hat. Whatever project you decide to do; give it your all. Make it meaningful. Something beautiful and deeply personal.

Spread the love!


Lise


Dr. King's House


With all of today's celebrations for Martin Luther King, I started to think about what his home would look like if he was still alive today.

I imagined that he would still live in Atlanta; the city where he was born. I pictured a brick home on a hill, with a clean manicured lawn. The neighborhood would be accessible - not gated. I don't picture him wanting to separate himself from other people.

At Easter I can just see him sitting on his front porch, alongside Coretta. They overlook the rainbow of children present at the annual Easter Sunday egg hunt. Together they watch a sea of young children dressed in their Sunday best, searching for brightly-colored Easter eggs near the magnolias and redbud trees. As two children begin to argue over the coveted candy within the last egg, Dr. King rises slowly from his seat and approaches the children. He offers a few words and immediately brings peace to the situation. Amicably dividing the prize; something he has been working on all his 78 years - equality for everyone.

Inside the large front door you'll find a library filled with books he's both read and written. Books that chronicle the history of our world. His published sermons are on the shelf and notes for next Sunday are carefully stored inside his desk drawer. Atop his desk are many photos - from family to foreign statesmen. This room is where he receives his guests - some expected, and some that were just in the neighborhood. At first you are struck by the room's tall and stately bookshelves, but looking at the unpretentious well-worn leather sofa, you find the room equally accessible. This is a man that cares deeply for people, and he's spent many afternoons discussing various matters with people he loves and respects.


Of course all that talk would make him hungry. And through a center hallway we find a dining room that holds a large table - enough to seat 20 or more. At any given time this room could be filled with politicians, famous talk show hosts ,or young children in party hats. On a rainy day you might find the table being used to create an elaborate drawing of the garden just outside the window. This room holds a lot of memories, and a lot of love.


And late at night, you might find Dr. King in the kitchen, sneaking a peek in the fridge for some of Coretta's left over dessert. Keeping the lights low, he might make his way over to the keeping room (his favorite one in the house). Sitting in his favorite chair near the fireplace to eat his peach cobbler, he puts his feet up on the hassock and reflects on the day's events.


On this day and always, I hope every conversation in every home will touch on this man, his dream, and a legacy of a life well lived.


Be well,


Lise

Style Points: Creative Holiday Décor

It seems like it starts earlier every year. The holiday season appears, marked by special edition magazines on newsstands, brimming with ideas for new holiday decorations. Breathtaking interior design photos illustrating holiday décor from the White House, to your neighbor's house, accompany these ideas. It can make you feel a bit overwhelmed; especially if you're brand new to designing your home for the holidays or if you want to make changes to bring new life to your home and you're not quite sure where to start. Here are some tips you may not have thought of to help you add more sparkling pizzazz to your holiday décor.

Inspired Color Schemes

A fabulous way to make a change to your holiday décor is by being imaginative with your color selections. Although I have a good set of holiday basics, each year I add a bit more to my collection of ornaments by incorporating a new color. So in future years, I am able to combine different elements together to create a new look. Every year I change the focus of color on my tree. Last year I tried non-traditional shades of celadon green and cream. It was unexpected and the colors were just gorgeous together. Adding to my collection allows me to increase the number of trees I decorate this year. Although I have one focal point tree, I love the idea of having a tree in the foyer, and in the dining room as well. I won't stop at trees either; I change the color of table settings, holiday ribbons, wreath picks and lights.

Tablescapes for holiday entertaining

A tablescape is a planned design for your table using various elements that make a unique statement. Tablescapes are fun to plan and are uniquely suited to your holiday table. Most often the table is set in preparation for a meal. However, you can certainly leave the table decorated all season long. Combine the color used throughout the house in your napkins, tablecloth, placemats and centerpieces. To create an inexpensive and eye-catching centerpiece layer fruit over greenery snipped from your back yard. Or taking a cue from my celadon green and cream color scheme I talked about earlier, use a fresh green apple to hold the place setting cards. At parties I have attended, I taken home place cards and menus which have been hand-beaded, stenciled, painted, and hand-lettered using calligraphy. These cards are a wonderful way to show off your creativity.

Being Creative without the Pressure

The primary reason I love the holiday season is because I get to spend more time with family and friends than I normally do throughout the year. I really think this is the best part of it all. I believe that decorating my home encourages togetherness and helps create new traditions, and special memories for all that pass through my door. With so many things to prepare for the weeks seem to fly by a little faster than normal at this time of the year. One way to simplify my life and make a bit more time for myself is by hiring an interior designer or decorator who specializes in holiday décor. I have found that interior designers can do as little or as much as you need them to do. Another great thing is that they offer a change of perspective that you may not have thought of. So if you enjoy taking part in the decorating of your home like I do, but feel as though it may be too much work, hiring a designer can help ease the holiday pressure and make your home beautiful. Be sure to book early though, good designers are quite busy around the holidays too.

Holiday Art Details

Did you know that your artwork could definitely be at odds with the rest of your holiday décor? This happens when summer art subjects or more abstract art is paired with holiday decorations. Surprisingly, it is an often-overlooked element when planning a change for the holidays. Your artwork should reflect who you are, your feelings and moods, and when you're in the mood to celebrate or appreciate time with your family, make sure that you think about how to change your artwork. It is ok to change your artwork around. A change to your foyer or mantle during the holidays will make a dramatic impact, without much cost. Removing or rotating art throughout your home at other times of the year creates new interest. Art is also available for short-term lease so the cost to you is kept to a minimum.

Cleanup

After the enjoyable dinners and visits from friends and family, it's easy to feel stressed by the mere thought of having to remove your decorations and put them away for another year. The key to making this a painless process, is through careful planning and organization. You may not have started last year, but it's never to late to plan for storage of your decorations safely and effectively. Choose clear and sturdy plastic boxes to store your light strings, ornaments, small wreaths and tableware. Wreath boxes are created especially for wreath storage but be warned that cardboard boxes may become damaged throughout the year depending on the storage conditions they encounter. Best to keep all holiday decorations in a temperature controlled area away from intense heat, cold or water. Wreaths can also be wrapped in plastic and hung in your garage, attic or basement. Finally be sure to label all the boxes on at least three sides so that no matter which way you place the box you can always see what is inside.

Best wishes to you as you plan your creative holiday décor!

____________________

Holiday Wreath Making, Buying Wholesale


I received an email this morning from a reader who was interested in making and selling holiday wreaths and wanted to find some resources for buying wholesale. I thought I'd share my response with everyone:

Debbie writes:

DO YOU HAVE ANY LINKS TO WHERE I MIGHT ORDER HOLIDAY PICKS LIKE MICHAELS CRAFT STORES SELLS. I WOULD LIKE TO BUY THEM WHOLESALE AS I WANT TO MAKE AND SELL WREATHS THIS FALL?

Hi Debbie,

Check out the following links:

Worth Imports

Santa Supplies

Direct Floral

Dollar Days

Rolands of California

Kincaide Studios

Also, depending on where you're located, you may have a local floral supply store that sells all types of wreath-making materials at a wholesale price. A local interior designer will also likely have a list of wholesale suppliers.I would love to see your projects!

Lise
__________
Side note:

Some of these companies sell wholesale only. Since Debbie is making and selling wreaths in large quantities, wholesale is definitely the way to go. Even if you want to make a number of projects to give as gifts, wholesale might be a good option for you. For smaller quantities, you can still find excellent retail sources that provide a decent price. Feel free to email me with any questions on buying wholesale.

Be creative!


Lise

Style Points: A Creative Costume


So this weekend, while at the mall with my daughter, we discovered this adorable lion costume at Pottery Barn Kids. I thought it would be adorable on my son Ethan (on the right).

But I decided not to buy it. I am determined to make one instead. And now, with that decision made, I'm doing research for a quick and easy costume idea, for a sewing novice. It doesn't look too difficult to make, but I would appreciate any pointers/ideas. If you have any patterns or ideas you can recommend for a simple lion costume, please post them or send them to me. Ethan and I thank you!

Be Creative!

Lise

Happy Mother's Day!


I hope you are enjoying your Mother's Day!

We are taking the day to be creative. Download the picture and be sure to color outside the lines!

Lise
_________________________

I See Me! Personalized Children's Books